Friday, April 19, 2013

2nd Floor Demo

Admittedly, my focus has been mostly on the main floor.  I'm craving my livingroom.  I'm dreaming of my kitchen.

It's all opened up and I can't wait to live in it.

But after I stopped in today, I'm kinda giddy about the 2nd floor, too...

We decided to demo the 2nd floor, after finding out there was no sign of insulation in any of the exterior walls.  And I am so glad we did. 

2nd Floor before

Initially, we were going to go as far as replacing the baseboards & leveling the floor.  Keep the plaster on the exterior walls (the left wall in the picture above) and keep the framing but apply drywall to the interior walls (the right wall above and studs behind the kids).

Then we decided to demo. 

2nd Floor after

Now she's as empty as the first floor.  And I love it!!!  Do we really need bedrooms!?!?

Opposite View - Staircase to the 3rd Floor

I love it because I can see all the bones.  And they are good.  Really good.

We found one little surprise in the back ceiling, in the area between those two windows.  Some water damage from the flat roof above due to structural sagging.  But an in-budget fix has been proposed and I'm not going to worry about it until I have to.


Also found was an old bird's nest above one of the bay windows in the master bedroom.  See that light spot above the window and below the bottom of the wood triangle?  That's a hole to the outside.  Nice.


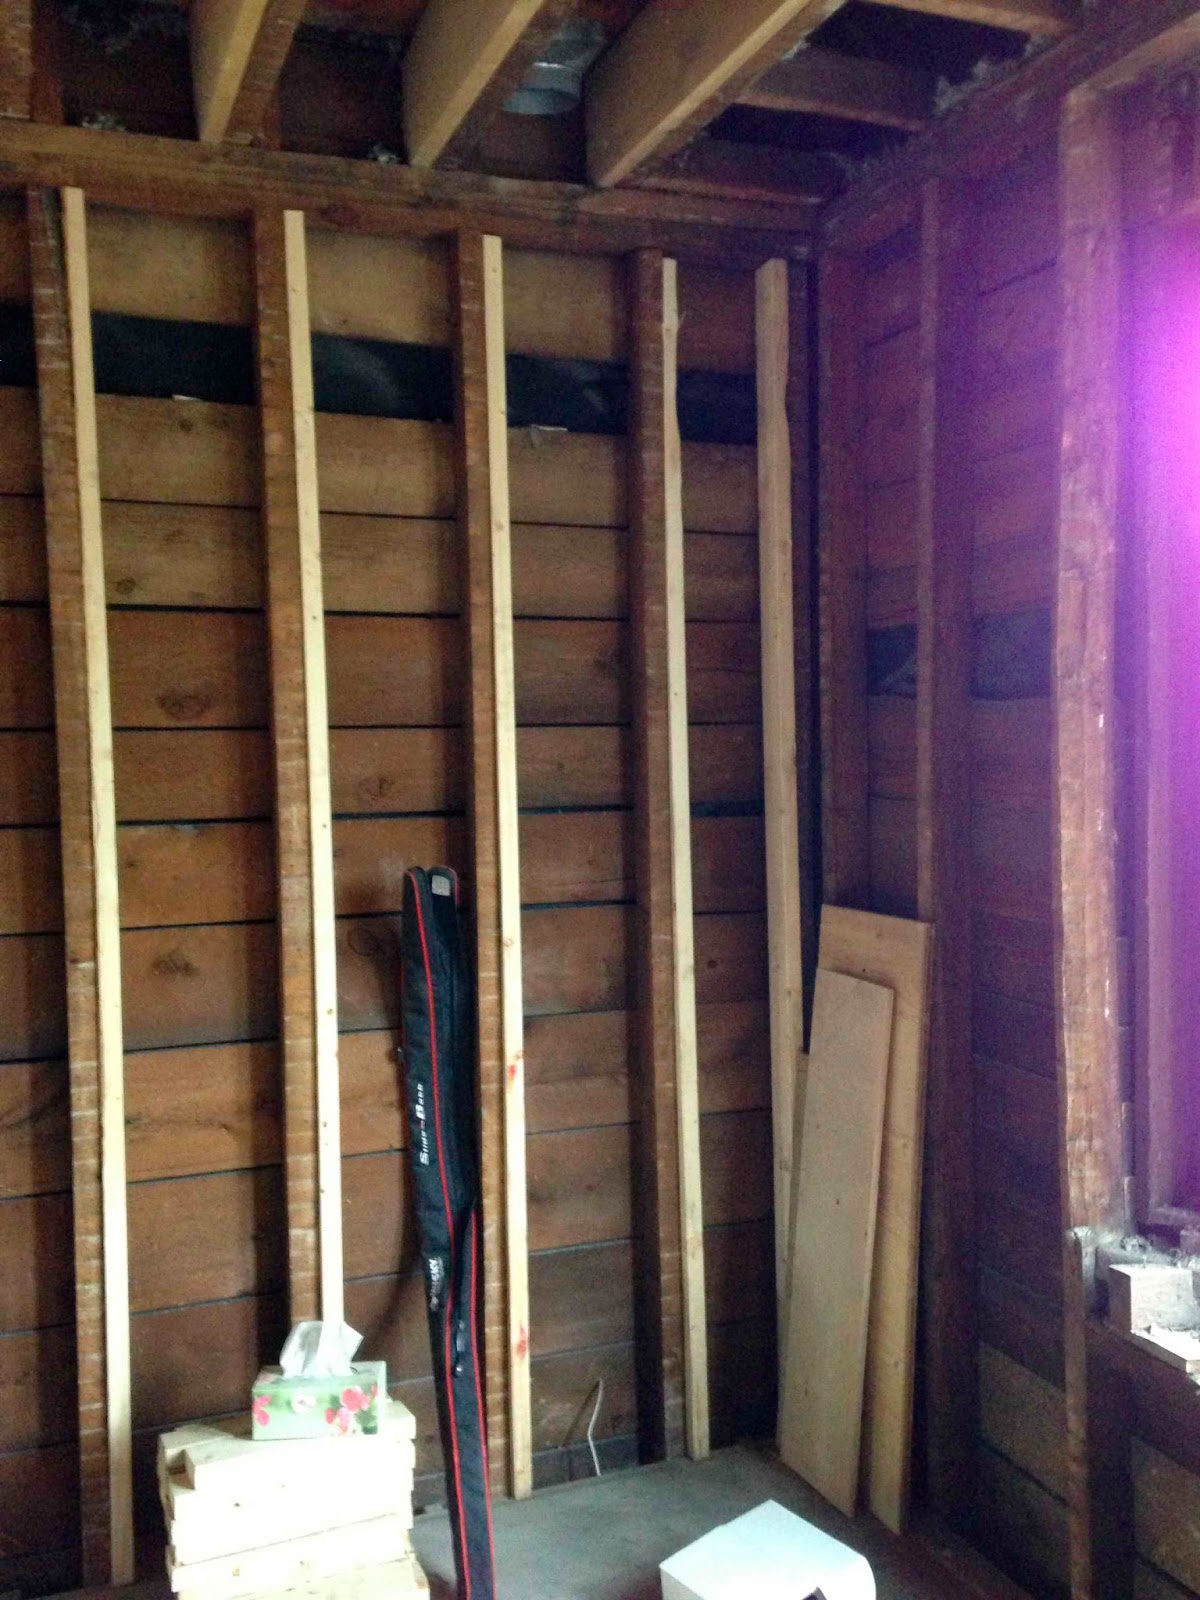
Then there were things we didn't find.  See that black stripe in the planks?  It extends the length of the entire exterior wall.  It's a missing wood plank.  Instead, the old tar paper is exposed.  You can see a 2nd missing piece on the adjoining wall to the right.

But luckily, this isn't an issue because we're sprayfoaming the whole floor.  Phew. 

Next up is a pow-wow with the designer and contractor to go over the floorplan.  Now that we have actual measurements, we can address that steel post in the kitchen and move forward with more framing.  Window and slider installation is on the horizon, too.

How many months to go in this apartment??

Monday, April 15, 2013

'Steel'-ing Myself

As I mentioned last week, we had some hang ups with the structural side of the project.  Nothing that turned into a deal breaker.  Just some frustrating, head banging, this-doesn't-make-a-whole-lot-of-sense and why-can't-we-use-wood conversations. 

Which led to a whole lotta steel and not a lotta spruce.

Behold the metal:

Exterior Wall
Sitting inside Shared Wall

This is the first of the two "frames" you see when you enter the house, where the wall between the living room and dining room used to be.  If you recall the initial structural discussion, this isn't a true frame, but rather a "buttress".  It's constructed as such in order to avoid placing a post on the second step of our main staircase.

My Bad Drawing

Where the beam sits inside the shared wall, that's #3 on this drawing.  The posts and beam in the basement are already there - the main floor post on the right side was welded directly into it. 

Got it?  Good.  House still standing.

Let's move to the 2nd frame in the back of the house.  The one we worried far less about....

Exterior Wall
Shared Wall

This frame is located where the dining room/kitchen wall used to be.  It's a true frame with four pieces.  The steel beam installed in the floor was inserted into the foundation of the exterior and shared walls. 

Thank goodness this was an acceptable way to install, because there was no way we were going to tear up the finished basement for posts to support the beam in the floor.  Breaking up a concrete floor with radiant heating was definitely a deal breaker.  Score this one for us.

However...my contractor flagged the depth of the steel posts which were exactly to the structural engineer's specs. 

4 Freaking Inches

Yup, that's a level framed out wall on the left of that picture.  And in the middle is the steel post on the exterior wall....sticking out 4 INCHES!  Wait, whaaa!!?? 

I insert a caveat here.  I knew it wasn't going to be exactly flush when the final steel was ordered and being installed.  But what I didn't know was how much it was going to stick out. 

See, we have a grand master plan for that wall. 

Kitchen Wall

You can see in this elevation drawing, we were worried the steel beam in the ceiling might stick out.  That's the box with the 'X' in the upper right corner.  What we didn't plan for was the post being the same size as the beam and not being able to hide completely in the wall. 

However...we have a possible fix.

Kitchen and Dining Wall

Since the kitchen wall flows into the dining area, our front-running option is to bump out the kitchen wall 4 inches and recess it back where the dining room begins.  We'll keep the cabinetry flush, so the lowers under the window will bump out 4".  Since the cooking countertop will continue from the kitchen to the dining area, you won't see the bump.  At least, that's the plan ;)

Well, the plan for now, anyway.  Our designer is away this week and we need her stamp of approval on this shift.  She can tell us what this will do to the walkway width between the range and the island, how we can make up that 4" and how this will affect the 12" return on either side of the slider on the back wall.  Issues, issues.

4 inches isn't much.  But it's something. 
It's a lot of something in a very narrow house.

So that's the word on structure & steel.  What's next?  Lots more demo'ing, leveling & framing.  We've got a whole 2nd floor to go.

Here's a sneak peek from Sunday (aka the only day of the week guys aren't working):

Two floors in one shot

This was the view when I opened the front door and looked up.  Hey, there's our old master bedroom & sink room!  Wait, where's the upstairs hallway floor....

Thursday, April 11, 2013

Demo'ing, Framing & Leveling...Oh My!

Lots of tech issues in the temporary apartment.  And I'm not tech-y.  Steve is even less so.  :(

But...progress is being made at the house and I'm sooooo excited.

I posted this on Instagram earlier this week:


Level temporary floors!  Framed opening for the slider!  Bare joists everywhere!

(Here's the before for reference)

Lots o' Walls
Suddenly I feel claustrophobic.


That's better. 

It's hard to tell, but the opening is huge.  Those are 9'+ ceilings. 

Maybe this will help.

Little kid is almost 4' tall

See?  Big.  As in almost too big.  In fact, actually too big. 

When I ordered our super fancy slider, I used the maximum measurements that I could find.  Remember our little plumbing issue?  Well, I never closed the hole in the upper corner cabinet.  Meaning I could stretch a tape measure from the bottom of a visible ceiling joist to the tile floor.  I took that measurement, reduced it a bit for drywall & an unlevel floor/ceiling, double checked with designer & contractor, and spec'ed out a slider and transom filling the height from top to bottom. 

Because super fancy means a 12-week lead time, there was no way for anyone to know at order time that the ceiling was out by 4 INCHES!!!  Thank goodness we're working with a super fantastic designer and her super fantastic contractor, because they came up with a super fantastic design element to disguise the fact that the finished ceiling will be too low for the height of the transom.

It's hard to explain the fix.  It involves a lip and lighting.  I'll dedicate a whole post to it when the framing is finished.  :)

Here's a few shots of the 2nd floor:

Guest Room above Kitchen

As part of the slider/transom framing down below, the first joist had to be removed.  It won't be replaced completely, since that gap will be part of the kitchen "ceiling fix".  But don't worry, dad, that hole in the floor won't be there when you return to our guest room.

Jake & Henry's Room

At first, we just wanted to replace the floors, switch the closets between the guest & boys' rooms, replace all trim and do some master bedroom & bathroom work.  But then we found out there was NO INSULATION IN ANY EXTERIOR WALL IN OUR ENTIRE HOUSE.  So we made the decision to demo the 2nd floor entirely.  It only makes sense to do it now, while the house is torn up already.  Sprayfoam was planned for the main floor...just bring it up to the 2nd floor, too. 

How long is that ball of string?

Remains of wall between Master & Boys'

This will be a wall of closets.  Pax, to be exact.  I am waiting with bated breath for the release of the new Pax door designs...coming to my local Ikea soon...

Master bay window

Already half-demo'd.  Say goodbye to that knob and tube hanging there.

All in all, things are going well.  Moving along, slowly but surely.  We had some hangups with the structural side of things.  Steel vs Wood.  Don't even get me started.  I think structural engineers like steel so they can sleep at night.  I don't need to know that I can land a helicopter on my house to sleep at night...but at the end of the day, I guess it helps. 

How about a good old before and after to finish up?

Before
After

Seeing pictures like this make me sooooo excited!!!!!

Wednesday, April 03, 2013

Make Way For A Slider

Ok, before I get to the slider, here's what I saw today when I opened my front door.


Three things you can see here:
1.  foreground: basement ceiling/main floor joists
2.  middle: floor leveling in process - new lumber attached to old bowed joists
3.  background: plywood over leveled joists - not nailed down, only temporary

We get to trash that new insulation we just put into the basement ceiling...oh well. 

Where was I?  The slider.

We decided to put an 8 foot slider into the back wall of our house with a transom above.  Everything about it makes sense.  Backyard access, maximum light and...who doesn't love a gorgeous slider like this:


This is the exterior, ours will be black.  I fell in love with the handle.


Why do so many sliders have less-than-attractive handles?  I'm gonna be looking at it all day every day.  It's gotta look nice.  And feel nice. 

Trust me, this one does.

And here's where it's going. 

Summer 2012

According to the plan, it will be positioned from the right of the door to the left of the window and above that awning. 

So while we were finishing our Easter holiday in WI, this happened.

Saturday Morning
Saturday Afternoon

Yes, these pictures from our contractor had me squealing with joy.  Look at that hole!  Imagine the light!!


Here's how it looks now.  Animal proofed, waiting for installation. 

Oh yeah, about that deck.


We were waffling on replacing the deck, mainly because it's in such poor shape.  I think we just made up our minds....